Posts

Showing posts from March, 2018

Tips for LaTeX

Table:  https://www.tablesgenerator.com/ Lists:  https://www.sharelatex.com/learn/Lists การกำหนดให้ตัวห้อยไม่เอียง (non-italic subscript text): V$_{\text{dd}}$ = V dd การกำหนดให้ข้อความในบรรณานุกรมเป็นตัวใหญ่ ให้ใส่วงเล็บครอบ สัญลักษณ์องศาเซลเซียส \textdegree{}C

การอัพโหลดข้อมูลกลับไปที่ Overleaf (Push)

Image
เมื่อแก้ไขข้อมูลด้วย TeXstudio เรียบร้อยแล้วเราสามารถอัพโหลดกลับไปที่ Overleaf ได้ด้วยคำสั่ง git commit -a -m "ข้อความช่วยจำ" ตามด้วยคำสั่ง git push origin master

การดึงข้อมูลจาก Overleaf เข้าคอมพิวเตอร์ด้วย Git (ครั้งต่อไป, Pull)

Image
เข้าไปที่โฟลเดอร์ข้อมูล (ในตัวอย่างคือ Test) จากนั้นใช้คำสั่ง git pull origin master

การดึงข้อมูลจาก Overleaf เข้าคอมพิวเตอร์ด้วย Git (ครั้งแรก, Clone)

Image
สมมติว่าเราสร้างเอกสารใหม่ใน Overleaf เรียบร้อยแล้ว ให้คลิกที่แชร์ ก๊อปปี้ Git URL กลับมาที่คอมพิวเตอร์ของเรา เปิด Command window ที่โฟลเดอร์ที่ต้องการจะเก็บข้อมูลจาก Overleaf ก๊อปปี้ไฟล์จาก Overleaf ด้วยคำสั่ง git clone Git_URL Folder_Name โดย Git_URL คือ URL ที่ก๊อปปี้ไว้ในข้อ 2 และ Folder_Name คือชื่อโฟลเดอร์ที่ต้องการเก็บข้อมูล (ในภาพตัวอย่างให้ชื่อ Test) ตอนนี้ไฟล์ทั้งหมดจาก Overleaf จะเข้ามาอยู่ในโฟลเดอร์ของเราแล้ว ใช้ TeXstudio แก้ไขได้เลย

การ Sync ข้อมูลระหว่าง TeXstudio กับ Overleaf ด้วย Git

Image
TeXstudio เป็นโปรแกรมสร้างเอกสารด้วยภาษา LaTeX ซึ่งเป็นที่นิยมเนื่องจากผู้ใช้สามารถแก้ไขเอกสารได้โดยไม่ต้องจัดรูปแบบเนื้อหามากนัก โปรแกรมนี้ต้องติดตั้งในคอมพิวเตอร์จึงไม่สะดวกในการทำงานเพราะ ผู้ใช้อาจมีคอมพิวเตอร์หลายเครื่อง  เช่น เครื่องที่ทำงาน เครื่องส่วนตัว เป็นต้น Overleaf เป็นทางออกหนึ่งสำหรับปัญหาดังกล่าวเพราะช่วยให้เราแก้ไขงานตีพิมพ์ของเราได้ทุกที่ (ผ่านหน้าเว็บ) แต่การแก้ไขและดูผลลัพธ์แต่ละครั้งจะ ค่อนข้างช้า เพราะข้อมูลที่เราแก้จะต้องถูกอัพโหลดขึ้นเว็บก่อนทุกครั้ง  ไม่เเหมือน TeXstudio ที่สามารถทำงานได้เร็วกว่ามากเพราะติดตั้งในคอมพิวเตอร์ บทความนี้แสดงวิธีการ Sync ข้อมูลระหว่าง TeXstudio กับ Overleaf ด้วย Git ซึ่งเป็นเครื่องมือช่วยจัดการข้อมูล (Version control) ด้วยการ Sync ข้อมูลนี้จะช่วยให้เราแก้ไขข้อมูลได้อย่างรวดเร็ว (ด้วย TeXstudio) และสามารถอัพโหลดข้อมูลเพื่อให้เปิดใช้ได้ทุกที่ (ด้วย Overleaf) หลักกการ ผู้ใช้สร้างเอกสารใหม่ใน Overleaf  ก๊อปปี้ Git URL ของเอกสารนี้ ดึงข้อมูลเข้าคอมพิวเตอร์โดยใช้ URL ในข้อ 2 (Clone สำหรับครั้งแรก และ Pull ส

Importing UMC 65nm Low-Leakage standard cell library to Cadence

Image
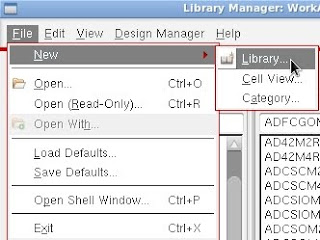
1. Create a new library for the standard cell. 1.1 At Library manager, Select the menu File->New->Library. 1.2 Name the new library eg. "umc65std2". 1.3 Select Attach to an existing technology library. 1.4 Select umc65ll. 2. Copy basic elements to the new library. 2.1 (Capacitor) At the Library manager->analogLib, right click at "cap" and select "copy". 2.2 Set the destination as umc65std2 (the newly created one), Name the cell as "capacitor". 2.3 (Resistor) At the Library manager -> analogLib, right click at "res" and select "copy". 2.4 Set the destination as umc65std2 (the newly created one), Name the cell as "resistor". 2.5 (Diode) At the Library manager -> umc65ll, right click at "DION_LL" and select "copy". 2.6 Set the destination as umc65std2 (the newly created one), Name the cell as "DION_LL_A". 3. Import the standard cel

การ Import SPICE model ของ UMC 65nm Low-Leakage standard cell library เข้า Cadence

Image
1. สร้างไลบรารีใหม่เพื่อเก็บ Standard cell 1.1 ที่ Library manager คลิกเมนู File->New->Library 1.2 ตั้งชื่อไลบรารีใหม่ เช่น umc65std2 1.3 เลือก Attach to an existing technology library 1.4 เลือก umc65ll 2. Copy อุปกรณ์พื้นฐาน 2.1 (Copy capacitor) ที่ Library manager->analogLib คลิกขวาที่ cap เลือก copy 2.2 กำหนดไลบรารีปลายทางเป็น umc65std2 (ที่ตั้งไว้ตอนต้น) กำหนดชื่อ Cell เป็น capacitor 2.3 (Copy resistor) ที่ Library manager -> analogLib คลิกขวาที่ res เลือก copy 2.4 กำหนดไลบรารีปลายทางเป็น umc65std2 (ที่ตั้งไว้ตอนต้น) กำหนดชื่อ Cell เป็น resistor 3. Import standard cell library 3.1 ที่ CIW คลิกเมนู File->Import->Spice 3.2 ชี้ Netlist file ไปที่ uk65lscllmvbbr.cir, เลือก SPICE ที่ Netlist language, กรอก analogLib, umc65ll, umc65std2 ที่ Reference library list ยังไม่ต้องคลิก OK! 3.3 คลิกที่แท็บ Output กรอกชื่อไลบรารีปลายทาง (ในที่นี้คือ umc65std2) คลิก OK Cadence จะเริ่ม Import ซึ่งจะใช้เวลานาน อาจจะ 1-2 วัน ถ้ามี Err